
Key takeaways
What matters before you keep reading
01
Measurements define target values; POMs define where those values are taken.
02
A useful spec section includes base size, units, graded measurements, and fit notes.
03
Generated measurements should be reviewed against the garment silhouette, fabric behavior, and sample stage before factory handoff.
Reader guide
Reader guide
A quick frame before the workflow details.
For
Apparel founders, technical designers, product developers, and teams preparing sample or fit review documents.
Read when
Best read before building the spec sheet, reviewing a first sample, or sending a pack to a manufacturer.
You'll get
A practical explanation of POMs, measurement tables, grading, and review checks.
On this page
Follow the article through the long read and keep your place.
On this page
5 sections
Measurements and points of measure are the part of a tech pack that make fit review measurable.
Without them, a factory can see what the garment should look like but not what size it should be. With them, the sample can be checked against clear targets.
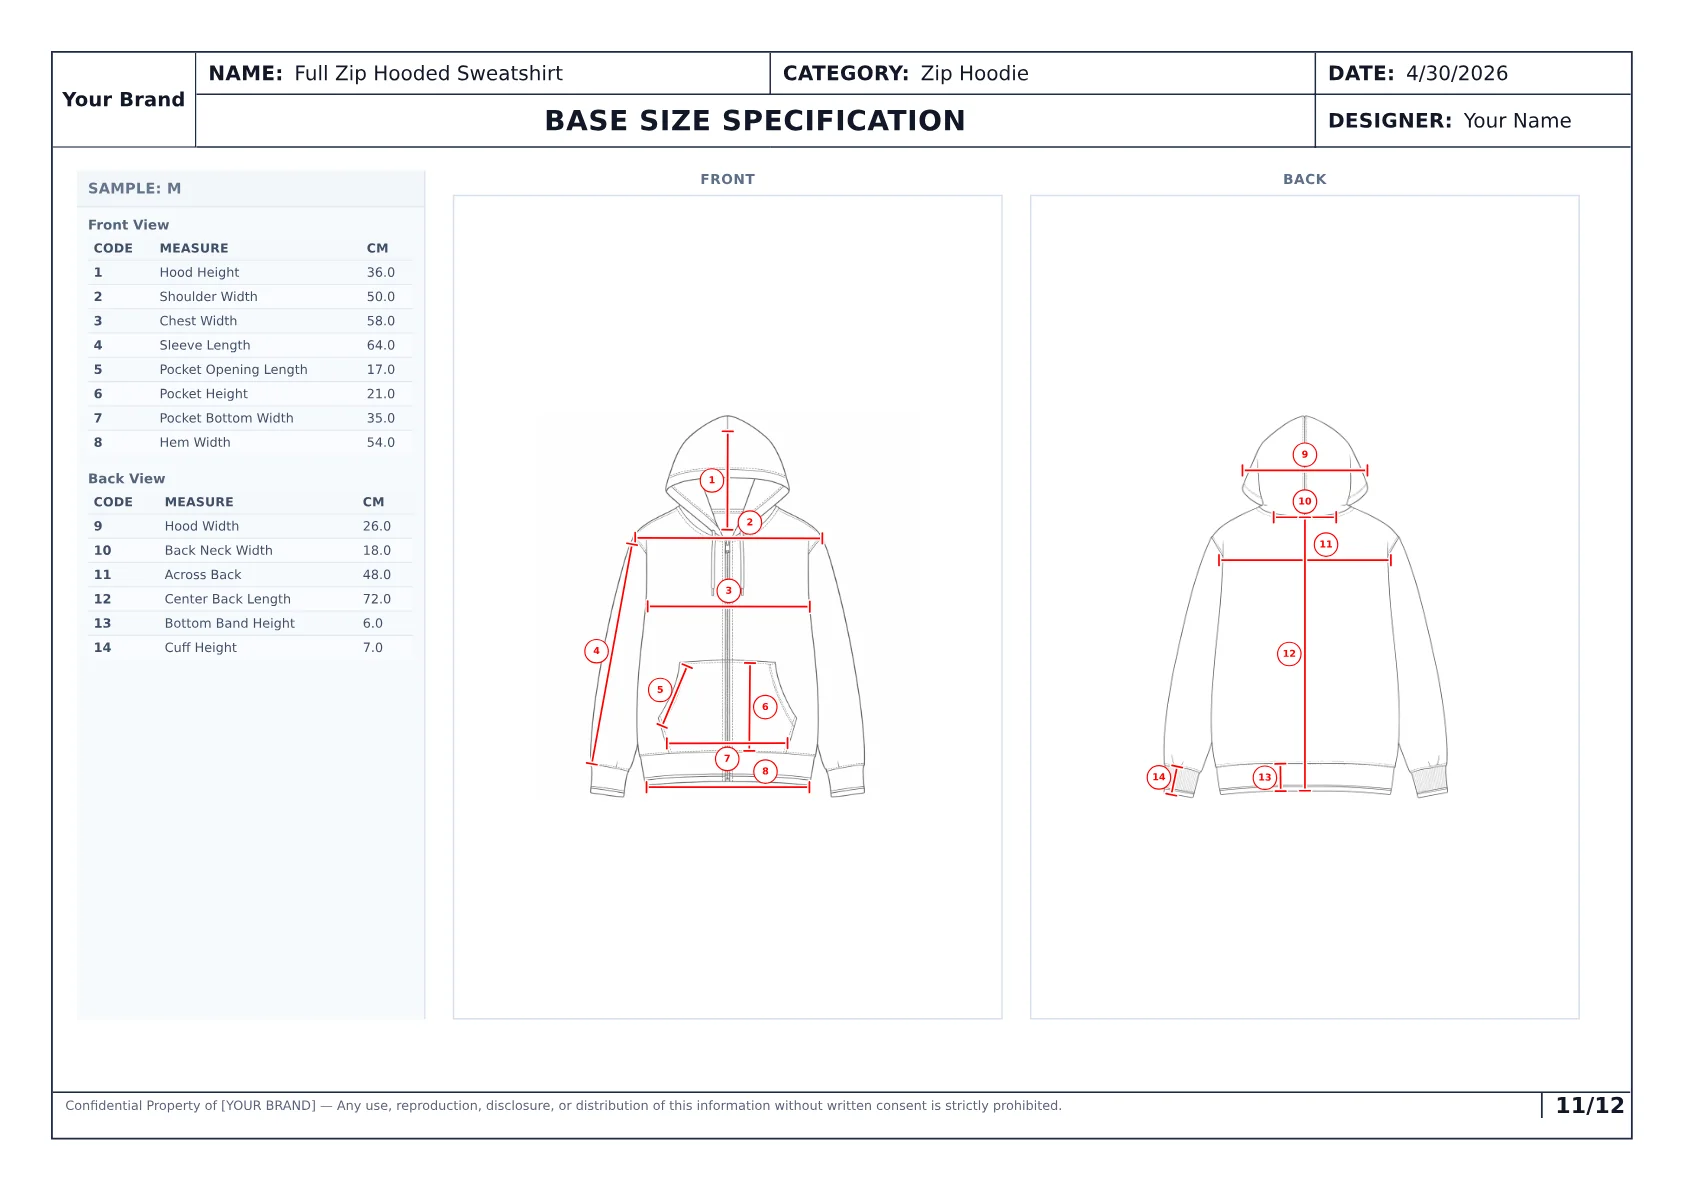
A measurement page shows base specs, POMs, units, and size logic clearly enough for sample review.
Measurements vs points of measure
A measurement is the value. A point of measure is the location and method.
For example:
- measurement: 24 inches,
- POM: body length from high point shoulder to bottom hem.
If the tech pack only says "length 24," the factory still has to guess how to take that measurement. The POM removes that ambiguity.
What the measurement table should include
A production-readable measurement table should include:
- measurement name,
- point of measure,
- base sample size,
- unit,
- value,
- grading across sizes if ready,
- notes for special measurement behavior.
The table does not have to be overcomplicated. It has to be unambiguous.
Common apparel POMs
Different garments need different POMs, but common examples include:
| Garment type | Common POMs |
|---|---|
| T-shirt | body length, chest width, shoulder width, sleeve length, sleeve opening, neck width |
| Hoodie | body length, chest width, sleeve length, hood opening, cuff width, bottom band width |
| Jacket | body length, chest width, shoulder width, sleeve length, hem opening, collar height |
| Dress | bust, waist, hip, body length, sweep, strap length, sleeve length if applicable |
| Bikini | cup width, cup height, strap length, underband, rise, waist, leg opening |
This is why copying another tech pack's measurement table is risky. The right POM set depends on the garment.
Grading and optional tolerance notes
Grading defines how measurements change across sizes. Tolerance notes define acceptable measurement ranges when they are needed for sampling or QC.
Early sampling may not have final grading. That is fine if the size-range notes are clear.
Use explicit labels for what the measurement page actually shows:
- base size confirmed,
- grading pending,
- review after first sample,
- factory-specific measurement notes needed before bulk.
Checklist
Measurement review checklist
Use this before sending specs to a factory or approving a generated draft.
POMs are named clearly
The factory can tell where each measurement is taken.
Base size is visible
The table is anchored to one sample size before grading.
Units are consistent
Inches, centimeters, or millimeters are not mixed without explanation.
Optional tolerance needs are clear
The team decides whether the factory needs extra tolerance notes for the current sample or production stage.
Values match the garment
Measurements make sense for the silhouette, fabric behavior, and construction.
How to review AI-generated measurements
Generated measurement drafts are helpful because they give the team a starting point. They should not be treated as final without review.
Check:
- whether the POMs match the garment category,
- whether the values are plausible,
- whether stretch or drape affects the measurement,
- whether construction details change how the garment should be measured,
- whether grading should be hidden, shown as draft, or finalized,
- whether the factory has asked for extra tolerance notes now or later.
Spec workflow
Review generated measurements before factory handoff
What changes across the process
- 01
Step 01
Generate the spec draft
Start from garment references, notes, fit direction, and size range.
- 02
Step 02
Review POM logic
Confirm whether the measurement names and locations fit the garment category.
- 03
Step 03
Approve or adjust values
Update values, grading, and any factory-specific measurement notes before sharing with the manufacturer.
The best workflow uses AI to create a strong first spec draft, then makes technical review explicit.
Process showing garment references becoming generated measurement specs and reviewed POMs
In practice
Inspect measurements in a generated example
The hoodie example includes measurement pages alongside BOM, callouts, construction details, colorways, artwork, and export-ready structure.
View the generated hoodie tech packFAQ
Common questions, answered clearly.
Points of measure are the named locations where garment measurements are taken, such as body length, chest width, sleeve length, waist, inseam, or leg opening.
Next step
Generate specs with the full tech pack
Styneo generates tech pack drafts with measurements, POMs, BOM, construction details, callouts, colorways, artwork, and export-ready structure from garment references and notes.